Introduction:
In this blog, I am sharing my journey in exploring 3D CAD through Rhino 3D—a powerful tool that has transformed my approach to design and modeling and how I created various models by using the different tools of Rhino 3D. Here I am showcasing my journey as a beginner to 3D CAD and gradually I will share more deeper insights into how I learnt to create advanced models in Rhino 3D
My Learning Journey:
When I first started
using Rhino 3D, I felt both excited and overwhelmed by the many tools it
offers. However, by following the guidelines and notes, provided to me by my
faculty, I gradually learnt how to create small models and later on, bigger
models. With each new model, the complexity increased, allowing me to explore
new tools and improve my skills step by step.
Some of the models that
I have created are as follows:
Starting small
● Dice
My first model in Rhino
was a dice, which introduced me to some basic tools. I started by creating a
box and used Fillet Corners to make the edges round. Then, I placed spheres for
the dice numbers and used Boolean Difference to subtract their shape from the
box. Finally, I applied OffsetSrf to add thickness, making the model ready for
3D printing.
Making the Dice had a
significant impact on my learning journey as it helped me boost my confidence
and curiosity to explore more tools in Rhino.

● Water Bottle
After the dice, I was
assigned to create a water bottle, which helped me work with precise
measurements. I created the outline of half of the bottle using free-form
curves and then used Revolve to complete the model.
Creating the water
bottle taught me the importance of precise measurements in modeling. I learned
how to use curves to define shapes and how the Revolve tool transforms a 2D
sketch into a 3D form. This experience improved my accuracy and design skills
in Rhino 3D.

Gradually learning new tools
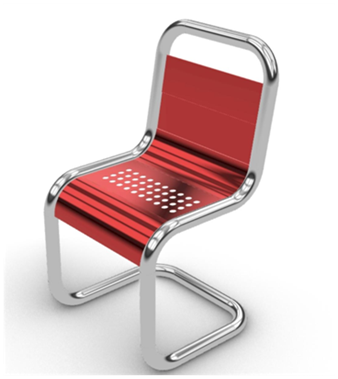
● Chair
Once I completed making
the basic models, the designs became more complex. My next task was to make a
chair, where I learnt some more tools like Pipe, Split, and EdgeSrf for
detailed modeling. To make the chair, I first created the frame and seat using
Polyline with accurate measurements. I used Pipe for the frame and Fillet
Corners to make the edges round. Then, I applied EdgeSrf for the seat and
created circles on the seat. Finally, I used Split to create holes.
Conclusion:
Through each model I created, I gained a basic understanding of Rhino 3D and improved my design skills. From basic shapes to detailed models, every project has helped me learn new tools and techniques. While I have come a long way, my curiosity keeps pushing me to explore more. I look forward to experimenting with new designs, mastering advanced tools, and continuously improving my skills in Rhino 3D.
Stay connected for more updates about my work in the upcoming blog!
Swastika Dhyani B Des (Foundation 2024)


No comments:
Post a Comment